
Asperion REST API#
Asperion has made an API available for third party software developers that intend to connect their commercial applications to the Asperion accounting software platform.
If you want to be an API partner with Asperion, then sign up via: https://www.asperion.nl/partners/api/
Your application will be evaluated and, if succesfull, you’ll receive the details for a test account (sandbox) and a client ID. This ID gives you access to the sandbox environment and the needed support and documentation to make your app a real success!
Do you have questions or need help with the integration of Asperion? Contact the API support team via: api-support@asperion.nl
The following documentation helps with the implementation of the REST API.
For more information about the available EndPoints, use this link : API Endpoints
SSL#
All connections with Asperion go via HTTPS. Minimum level is TLS1.3. Unencrypted traffic is not allowed.
Language Header#
To specify the language in which you want to receive error messages and validations from the API, you can use the Accept-Language header. This header determines the language of the API responses.
Example using cURL:
curl -X GET "https://api.asperion.nl/some-endpoint" \
     -H "Accept-Language: en-US"
In this example, the language is set to English (United States). You can adjust the language code to your desired language (e.g., nl-NL for Dutch (Netherlands)).
Make sure to include this header in all your API requests to receive the appropriate language-specific responses.
For more information, you can visit to the MDN documentation on Accept-Language: https://developer.mozilla.org/en-US/docs/Web/HTTP/Headers/Accept-Language
Authorization#
In order to use the API, access must be validated. The API partner requires the Client-ID for this.
This is released upon request by our API-support department.
For the authorization of the user data, Asperion API uses the protocol oAuth 2.0.
oAuth is a authentication standard in the industry. For more information, take a look at: https://oauth.net/
Api authentication and multi tenancy#
All API requests must contain an authorization header.
This header must contain a Bearer token (access token). This accesstoken kan be requested using the Asperion authentication service.
You can retrieve the data of an administration (Tenant) by adding a parameter X-Tenant-Id in the header.
Authentication endpoint is available via:
- https://identity-sandbox.asperion.nl (SandBox / Test Environment)
- https://identity.asperion.nl (Production)
Authentication process#
The oAuth2 Authorization Code Flow is used
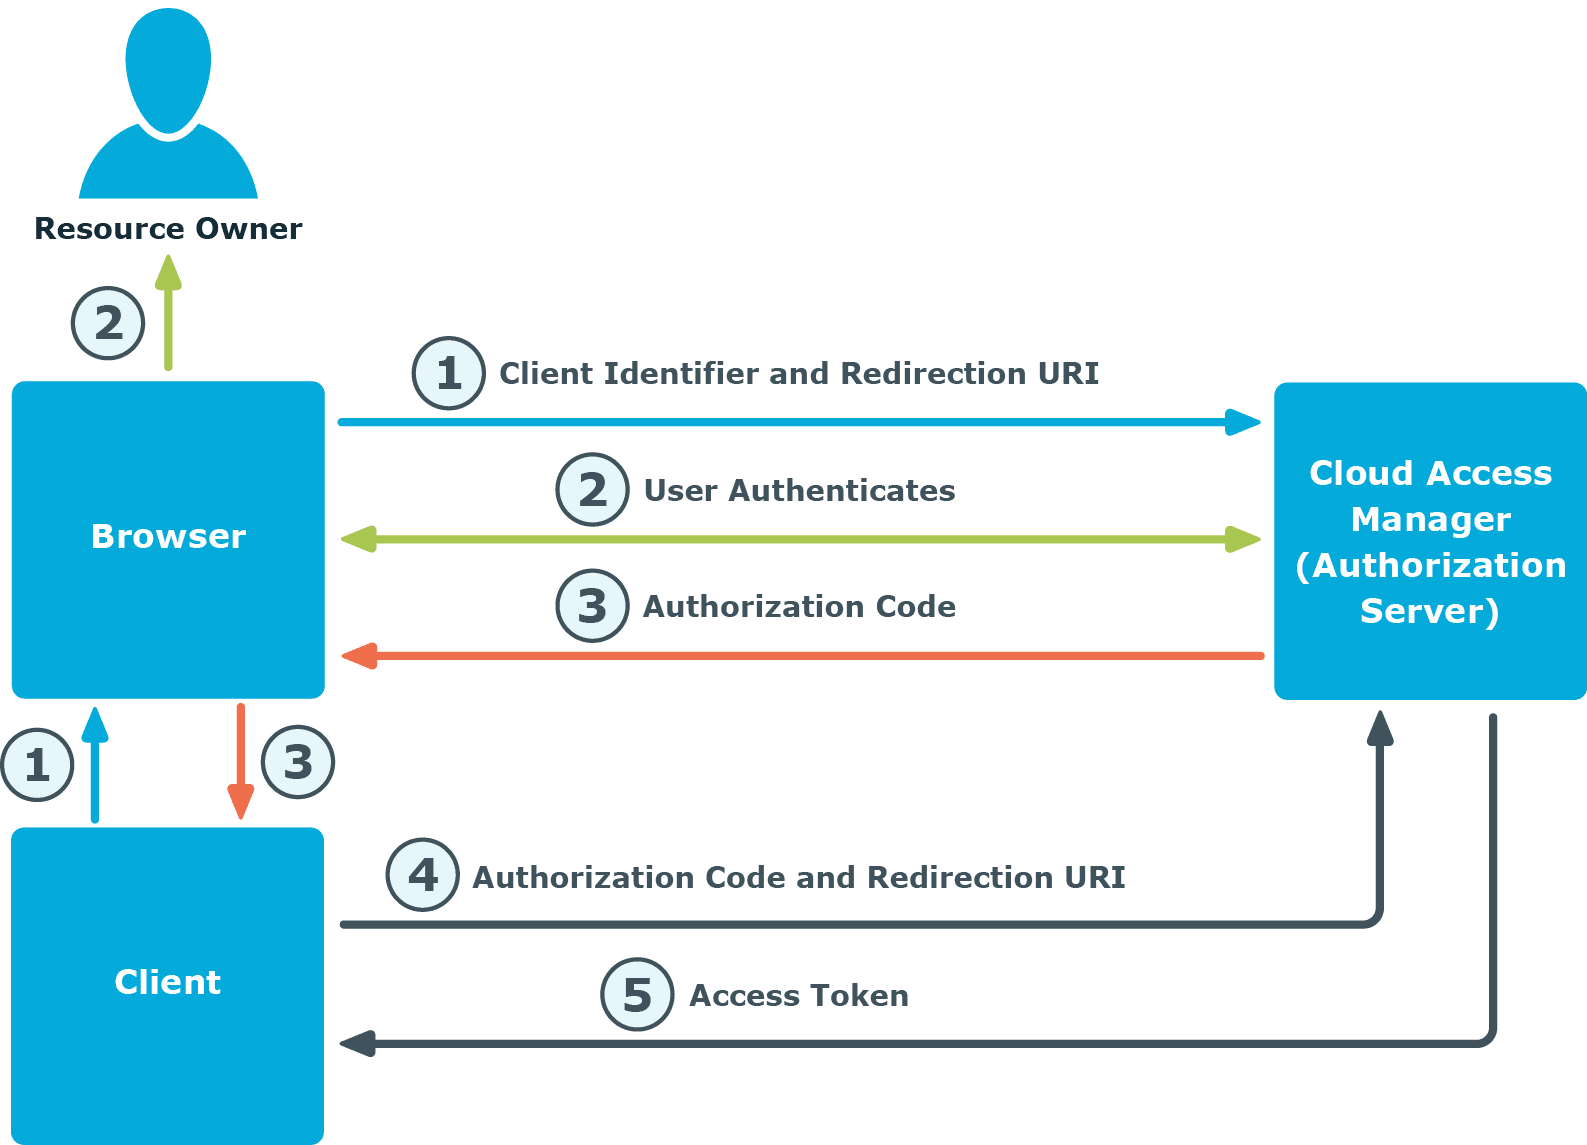
- The user will be redirected to a login page (Authorize Endpoint)
- The user will be authenticated.
- User will be send back to the client, with an authorization code.
- This authorization code will be validated by the authentication server (Token Endpoint)
- An access_token (and refresh_token) will be send back to the client
An access_token has a limited validity and it’s possible to request a new access_token (without the interference of a user) with the help of a refresh_token.
Authorize Endpoint#
The user will be redirected by the client application to this url to start an authentication. If all parameters are correct, the user will be able to login.
GET /connect/authorize?
    client_id=client&
    scope=asperion-api offline_access&
    response_type=code&
    redirect_uri=https://myapp/callback
Parameters#
- client_id
Unique identifier of the client (issued by Asperion) - scope
One or multiple scopes, for access to the api, the scope: asperion-api will be requested.
In order to access a refresh_token, the scope offline_access should be requested. - response_type
This has to be ‘code’, corresponding with the Authorization Code Flow - redirect_uri
The uri to be redirected after the user has logged in, this has to be an uri that has been signed up at Asperion
Token Endpoint (authorization_code)#
POST /connect/token
CONTENT-TYPE application/x-www-form-urlencoded
    client_id=client
    &client_secret={secret}
    &grant_type=authorization_code
    &code={received code}
    &redirect_uri=https://myapp.com/callback
(Form-encoding removed and line breaks added for readability)
Parameters#
- client_id
Unique identifier of the client (issued by Asperion) - client_secret
Secret string to validate the client (issued by Asperion) - grant_type
Description of the way to retrieve the token.
In order to retrieve an access_token with an authorization code, an authorization_code is expected - code
The code given via the de redirect_uri of Authorize Endpoint - redirect_uri
The same redirect uri as with the Authorize Endpoint
Response#
If all parameters are correct and valid, the POST request above will result in an access_token and a refresh_token
The response also contains expires_in: the lifetime of the access_token, in seconds. See Token lifetime and refresh.
Token Endpoint (refresh_token)#
POST /connect/token
    client_id=client&
    client_secret=secret&
    grant_type=refresh_token&
    refresh_token=token
Parameters#
- client_id
Unique identifier of the client (name given by Asperion) - client_secret
Secret string to validate the client. (issued by Asperion) - grant_type
Description of the way to retrieve the token.
In order to retrieve an access_token with a refresh_token - refresh_token
The refresh_token issued by the token endpoint (authorization_code).
Response#
If all parameters are correct and valid, the POST request above will result in a new, valid access_token and refresh_token.
The refresh_token that you sent is no longer valid after this call: store the new refresh_token from the response before you continue. See Token lifetime and refresh for the lifetime of both tokens and for what this means for your client.
Token lifetime and refresh#
Both the access_token and the refresh_token have a limited lifetime. These lifetimes are a server setting and can change, so do not put a fixed number in your code: use the lifetime that the token response returns for the access_token, and follow the behaviour described below for the refresh_token.
access_token#
- An access_token is valid for a limited period. At this moment that period is one hour.
- The token response returns that lifetime in the field expires_in, in seconds. This applies both to a request with grant_type authorization_code and to a request with grant_type refresh_token. Use that value to decide when to refresh.
refresh_token#
- Lifetime. The lifetime of a refresh_token is configurable. The default that Asperion applies is slightly more than one month.
- Sliding expiration. Every time you exchange a refresh_token at the Token Endpoint, a new refresh_token is issued, and that new token starts the same period again. A client that keeps refreshing therefore keeps its access. A client that stays idle longer than the lifetime of its last refresh_token has to send the user through the Authorize Endpoint again.
- A refresh_token can be used once. As soon as the Token Endpoint has accepted a refresh_token, that token is no longer valid. The response of that call contains the refresh_token to use next time.
- There is no grace period. A refresh_token that has already been used is not accepted a second time, not even shortly afterwards. There is currently no setting to keep a used refresh_token valid for a short while, not even for an individual client.
What this means for your client#
- Store the new refresh_token in the same step in which you receive it, before you put the new access_token to use. If your application loses the response of a refresh call, the refresh_token that was sent is gone with it and the user has to authorize again.
- Avoid two refresh calls for the same refresh_token at the same time, for example from two parallel jobs. The second call presents a token that the first one has already replaced, and that call fails.
- If a refresh call fails, do not retry it with the same refresh_token. Start a new authorization via the Authorize Endpoint.
- Refresh on the basis of expires_in, with a margin, rather than waiting for a 401 on an API call.
Do you have a question about these lifetimes for your own integration? Contact the API support team via api-support@asperion.nl.
Asperion API#
The Asperion API is a way to get access to the data from the Asperion accounting application for external software.
The API is based on REST (REpresentational State Transfer)
Structure#
- REST based, via HTTPS
- With the help of endpoints and the HTTP methods, objects can be requested and modified.
- GET – Request
- PUT / PATCH – Modify
- POST – Add
- DELETE – Delete
- The API is available via the following url’s (endpoins)
- https://api.asperion.nl (production environment)
- https://api-sandbox.asperion.nl (sandbox/test environment)
Technical documentation (Swagger)#
- Technical documentation is available. (See: https://api-sandbox.asperion.nl/swagger/v1/swagger.json )
- This documentation is generated based on the available endpoints based on Swagger
- This allows us to generate code in every programming language available (See: https://swagger.io/tools/swagger-codegen/ )
- A swagger UI is also available: (See: https://api-sandbox.asperion.nl/swagger/index.html )
- The Swagger UI of the production environment: (See: https://api.asperion.nl/swagger/ )
Datawarehouse#
Is your intended as an API partners to regularly load large datasets from Asperion — for example, to power data warehouse pipelines or Power BI reports built on financial mutations?
Follor this guideline: Guideline to refresh data
HTTP Methods#
GET /objects#
- Sorting (changing the order of the result)
- Filtering (carrying out specific queries)
- Fields (which field of the object are requested)
- Pagination (giving up the page number and page size)
GET /countries?page=1&pageSize=2
{
  "_data": [
    {
      "id": 1,
      "name": "The Netherlands",
      "code": "NL ",
      "_meta": {
        "self": "https://api.asperion.nl/v1/countries/1"
      }
    },
    {
      "id": 2,
      "name": "Belgium",
      "code": "BE ",
      "_meta": {
        "self": "https://api.asperion.nl/v1/countries/2"
      }
    }
  ],
  "_meta": {
    "previousPage": null,
    "nextPage": "https://api.asperion.nl/v1/countries?pageSize=2&page=2",
    "totalCount": 246,
    "pageCount": 123,
    "self": "https://api.asperion.nl/v1/countries?pageSize=2&page=1",
    "administrationId": 1234,
    "administrationName": "Test",
    "profileName": "UserName"
  }
}
Example:
orderby= id is asc, orderby= -id is desc
* Filtering
You can filter multiple fields at once by doing the following: GET /v1/articles?Id=563418&Id=563419
By using the same query string parameter multiple times, you can retrieve multiple records at once.
This way, an “OR” is placed in the middle of the same field, and if you’re filtering other fields you can place an “AND” in this place.
* MetaOnly
With GET, you’re getting the opportunity to impart a MetaOnly (bool) property.
With the MetaOnly bool, only the de _meta data will be returned, so only the numbers will be returned and the data object will be left out.
GET /objects/{id}#
Retrieving a single object based on the Identifier, the parameters here are:
- Fields (which fields of the object are requested)
GET /countries/1
{
  "id": 1,
  "name": "The Netherlands",
  "code": "NL ",
  "_meta": {
    "self": "https://localhost:44366/v1/countries/1",
    "administrationId": 1234,
    "administrationName": "Test",
    "profileName": "UserName"
  }
}
POST /objects#
- POST in order to add an object
- The body of the request will be provided with the updated object
- What fields are available via the Swagger documentation.
POST /countries
{
  "name": "The Netherlands",
  "code": "NL "
}
If the object is succesfully created, it will be returned via the response body with a status code 201. A location header will be available with the url of the newly created object.
A 400 (Bad Request) will be brought up if the validation rules and standards of the object aren’t met (together with the reasons why).
PUT /objects/{id}#
- Edit an existing object
- The url refers to an existing object
- The body of the request will be provided with the updated object
POST /countries/1
{
  "name": "Nederland",
  "code": "NL "
}
PATCH /object/{id}#
- Existing object will be partially deleted
- The url refers to an existing object
- The body of the request will be provided with updated fields of the object
- Only the specified fields will be modified, the rest will keep the existing values.
PATCH /countries/1
{
  "name": "Nederland"
}
DELETE /objects/{id}#
- Delete object
- This will delete the object, (if the validation rules are followed)
DELETE /countries/1
Validation Error Response.#
If a POST, PUT, PATCH OR Delete request is made to add, update or delete an object, validation of the input data is performed.
If there is anything wrong with the data, a 400 Bad Request response will be returned.
The body of the 400 Response will contain a JSON response to provide detailed information on the specific errors.
The ‘errors’ object in the response is a dictionary, where the key is a reference to the field that has an invalid value.
This key can reference a direct field, or can contain an index to a specific line (in case of the …withLines endpoints).